

 (bottom of page)





CafeSaxophone Forum

Cafe Moderator
Commercial
Soundproofing: DIY “Room Within a Room”
Home studio acoustics Part 1
Home Studio Acoustics Part 2 – Making HF Absorbers
Note that acoustic tiling, foam tiles or eggboxes will only cut down reverberation inside the room, they do practically nothing to stop sound from being transmitted to or from the room.
The most basic type of soundproofing is to add solid matter to existing walls and ceilings: you can do this by fixing layers of thick plasterboard, however this will only cut sound transmission slightly. Double glazing will also help but if you need to be a bit more serious then you need a “room within a room”, ideally a “floating” room made from stud walls and ceiling with at least two or three layers of thick plasterboard on each side. This is basically a box “floated” on rubber so as not to transmit sound from the walls down to the floor of the house and then to all the other rooms.
To float the room it should have it’s own wooden floor that is sitting on a layer of neoprene rubber or specifically designed soundproofing mat. A cheaper solution is to try a couple of layers of rubber carpet underlay, but bear in mind that this will be the hardest bit to replace if you get it wrong.
For windows use thick glass (at least 1/4″), ideally double glazed and set so that they are not exactly parallel in order to cut down resonance. A single pane of very thick glass is better than standard sealed double glazing.
For a door get a 30 minute (at least) firedoor and seal around it with rubber, including the bottom so it will need a sill.
Now for the important bit:
Ideally you need two of vent holes with fans, one for air in and one for air out. You can get by with just a fan on the extraction hole. Normal kitchen fans are quite noisy as they are bigger and faster than necessary for normal airflow as they are designed for extracting smells very quickly but if you get a 12v fan (available from Maplins, Tandy or Radio Shack), you can control it’s speed with a cheap all purpose power adapter that switches between 3v – 12v.
Here is a basic diagram of how to make a vent baffle that will help cut down sound transmission. The whole thing can be made out of 1/2 inch MDF and is about 4 feet by 2 feet by 2 feet. All the internal surfaces should be lined with rockwool (RW3) and sprayed with varnish or paint to stop dust and bits of fibreglass. If you don’t have room for this type of baffle you need to make sure the vent holes are as small as possible and that the ducts are as long as possible or lead into something like a chimney. As long as you don’t light a fire.

As the studio is solely for my own production and is not hired out, I do not need the control room to sound perfect from every position as you would if there were different people listening from various positions. (It’s very annoying to be sitting at a desk only to have a band member pipe up from the back of the room asking you to turn the bass down, and have to say “come over here and listen to it as it’s always too bassy back there”). Sooner or later I shall work on getting the room more accurate from all angles, but I decided my priorities were to get it right my normal mixing position: sat in front of the speakers with me forming one point of an (approximate) equilateral triangle.
Some of this is science, some is trial and error. In my previous studio I employed a consultant, Howard Turner (Studio Wizard) to give me some advice, which was basically how to set up the monitors and to dampen the high and mid frequencies as the room would be too reverberant otherwise. I also considered bass traps, however I was lucky in that the bass was not a real problem apart from right at the very back of the room. I also always try to get feedback from mastering engineers to find out if they had to do much EQing to my mixes. (NB. sending a mix off to be mastered by an experienced mastering engineer is a great way to check how well your control room is behaving).
My aim is to make the ambience of the control room feel similar to a typical living room. If the control room is too dry I would probably add too much reverb to the mixes and they would sound too wet on a typical home stereo or on a TV. Similarly if the control room is too reverberant my mixes would end up too dry. Having done a mix I try to listen in as many different environments and systems as possible. It’s probably impossible to get one mix to sound right on every system, but you soon get an idea if there is a basic fault with the room – if your mix sounds OK in the control room, but lacks bass, is muddy or is too dry in all other situations you still have some work to do.

The absorbers I built are basically wooden boxes lined with Rockwool with a frame across the front over which is stretched some acoustically transparent material, in this case hessian. You need some basic tools and very basic DIY knowledge, e.g. how to use a saw and screw two pieces of wood together. Expert DIYers and carpenters can probably ignore the instructions and will probably do a much better job than I did, however I’m very happy with the results which look good and most importantly – they work very well. The sides of the boxes are timber 4″ x ½”. The back is hardboard with a couple of battens across for strength, although the backs could just be thicker wood or MDF. I chose hardboard and battens for lightness. Here I shall outline how to build a box 2’ x 4’


You could of course leave it like it is, you now have a fully functioning HF absorbing panel, but it will look much better with a screen on the front. This is basically a frame made from wood battening with an acoustically transparent material such as hessian stretched across. The screen can other be the same size as the box and screwed onto the front (as in this illustration of the ceiling panels), or it can be made a bit smaller and set just inside, which I think can look just a tad more professional: To do this you need to make the external dimensions of the frame the same as the internal dimensions of the box, minus a little bit to allow for the thickness of the hessian. As the exact thickness of timber you used for the sides of the box may vary depending on your supplier, I won’t give the exact dimensions here, but once you have the material you can experiment to work them out. The method below is for the screens mounted inside the box.


Mount the panels using some bent brackets
You could just screw them to the wall but it’s advisable to mount them at least 2″ from the wall as they will work much better. To do this I fixed some angle brackets onto a piece of batten along the back of the absorber. This is fixed about 6″ from the top of the panel, glued to the back and screwed into the sides. I then bent over the ends of the brackets with a pair of pliers to hook over some battening on the wall. This has a couple of bits of smaller battening glued on top as lips for the brackets to hang on. My walls were brick, but if you have a stud wall you will need to find a timber stud to screw into or use plenty of plasterboard fixings.

Spacer at bottom to hold away from wall
I then put another batten at the bottom of the panel and used a piece of 2″ wood as a spacer which does not support, it just holds the panel away from the wall. Mounting the ceiling panels was a bit tricky as you must find a joist to screw into, I wouldn’t trust a plasterboard fixing on a ceiling – if you do on your own head be it. I used a hook in each corner and some strong link chain. The panels above the mixing desk are angled slightly upwards towards the middle of the ceiling, and have some extra rockwool and batting laid on top for extra absorption.
The mobile high frequency absorber:

Coming soon part 3: Acoustic diffusers. (As soon as I've made them)
Home studio acoustics Part 1
Home Studio Acoustics Part 2 – Making HF Absorbers
Soundproofing: DIY “Room Within a Room”
You will be very lucky to get complete sound proofing for your studio or rehearsal room, but for basic home recording or practising you will get away with partial soundproofing, unless your family/neighbours are really nasty, or you need to cut out the noise from low flying aircraft. When I was at college my landlady complained about my constant saxophone practising so I used to get inside a wardrobe to practise. This worked to a certain extent but was not very pleasant.Note that acoustic tiling, foam tiles or eggboxes will only cut down reverberation inside the room, they do practically nothing to stop sound from being transmitted to or from the room.
The most basic type of soundproofing is to add solid matter to existing walls and ceilings: you can do this by fixing layers of thick plasterboard, however this will only cut sound transmission slightly. Double glazing will also help but if you need to be a bit more serious then you need a “room within a room”, ideally a “floating” room made from stud walls and ceiling with at least two or three layers of thick plasterboard on each side. This is basically a box “floated” on rubber so as not to transmit sound from the walls down to the floor of the house and then to all the other rooms.
To float the room it should have it’s own wooden floor that is sitting on a layer of neoprene rubber or specifically designed soundproofing mat. A cheaper solution is to try a couple of layers of rubber carpet underlay, but bear in mind that this will be the hardest bit to replace if you get it wrong.
For windows use thick glass (at least 1/4″), ideally double glazed and set so that they are not exactly parallel in order to cut down resonance. A single pane of very thick glass is better than standard sealed double glazing.
For a door get a 30 minute (at least) firedoor and seal around it with rubber, including the bottom so it will need a sill.
Now for the important bit:
Ventilation
OK, so now you have created some very effective soundproofing, but you will suffocate in this studio unless you either open the door every few minutes or work out some kind of ventilation system with baffles (see below). Air conditioning is a very useful but still needs ventilation or frequent door opening. The quietest air conditioners are those that gradually ramp up and down with the thermostat rather than the on/off type, I have a Sharp AY-XO95E which is quieter than my Macpro.Ideally you need two of vent holes with fans, one for air in and one for air out. You can get by with just a fan on the extraction hole. Normal kitchen fans are quite noisy as they are bigger and faster than necessary for normal airflow as they are designed for extracting smells very quickly but if you get a 12v fan (available from Maplins, Tandy or Radio Shack), you can control it’s speed with a cheap all purpose power adapter that switches between 3v – 12v.
Here is a basic diagram of how to make a vent baffle that will help cut down sound transmission. The whole thing can be made out of 1/2 inch MDF and is about 4 feet by 2 feet by 2 feet. All the internal surfaces should be lined with rockwool (RW3) and sprayed with varnish or paint to stop dust and bits of fibreglass. If you don’t have room for this type of baffle you need to make sure the vent holes are as small as possible and that the ducts are as long as possible or lead into something like a chimney. As long as you don’t light a fire.
Home studio acoustics Part 1
This is a brief outline of how I have carried out some basic DIY acoustic treatment to my studio. Although I call this a home studio it needs to be capable of professional quality recording and mixes for my work writing and producing music for TV and film. I am lucky enough to have a live room which sounds great without needing much at all in the way of acoustic treatment so I have concentrated on the control room.As the studio is solely for my own production and is not hired out, I do not need the control room to sound perfect from every position as you would if there were different people listening from various positions. (It’s very annoying to be sitting at a desk only to have a band member pipe up from the back of the room asking you to turn the bass down, and have to say “come over here and listen to it as it’s always too bassy back there”). Sooner or later I shall work on getting the room more accurate from all angles, but I decided my priorities were to get it right my normal mixing position: sat in front of the speakers with me forming one point of an (approximate) equilateral triangle.
Some of this is science, some is trial and error. In my previous studio I employed a consultant, Howard Turner (Studio Wizard) to give me some advice, which was basically how to set up the monitors and to dampen the high and mid frequencies as the room would be too reverberant otherwise. I also considered bass traps, however I was lucky in that the bass was not a real problem apart from right at the very back of the room. I also always try to get feedback from mastering engineers to find out if they had to do much EQing to my mixes. (NB. sending a mix off to be mastered by an experienced mastering engineer is a great way to check how well your control room is behaving).
My aim is to make the ambience of the control room feel similar to a typical living room. If the control room is too dry I would probably add too much reverb to the mixes and they would sound too wet on a typical home stereo or on a TV. Similarly if the control room is too reverberant my mixes would end up too dry. Having done a mix I try to listen in as many different environments and systems as possible. It’s probably impossible to get one mix to sound right on every system, but you soon get an idea if there is a basic fault with the room – if your mix sounds OK in the control room, but lacks bass, is muddy or is too dry in all other situations you still have some work to do.
Monitors
I use JBL LSR4328 active monitors. These are especially useful as you can “tune” them to a particular listening position in the room. Choice of studio monitors can be very subjective, but they should of course be designed to allow you to hear plenty of detail without flattering the sound. Hi Fi speakers are often designed to enhance the sound at some frequencies which may cause you to under-emphasise those frequencies when you mix. I built some stands for them which are basically columns made from 1/2″ thick MDF 3 feet high by 10 inches by 10 inches and filled with sand to isolate the speakers. I based the height of the stands on having the tweeters at the same level as my ears when I’m sitting down.Absorption & Diffusion
Once the sound is out there in your room you have two main considerations, Absorption and diffusion. My aim was to cut down the reverb time of the room using absorbers, but to leave enough sound reflection so that I did not compromise by adding too much reverb to the mixes. Luckily the room is not completely square, parallel walls can cause the worst problems as the sound waves will bounce back and forward.Diffusion
Dedicated diffusion panels will help to diffuse waves which might otherwise bounce around, however I decided to wait and see if there were any problems once I’d sorted out the absorption. As it happens everything seems to be quite good. Once you get some furniture and a few irregular surfaces such as bookshelves and ornaments you may find that is all the diffusion necessary. In fact I seem to remember a Sound On Sound article which mentions that a bookshelf (ideally with different size books) can make a great diffusion panel. Purpose built diffusion panels are available but I shall be researching some DIY alternatives soon…Bass Absorption
The thicker and more solid the walls are, the more likely you are to get a problem with bass frequencies (something to be aware of when soundproofing). Once again I was quite lucky with this room, the back of which is formed by a bay window with sealed double glazing units. These act as a bass trap, but only at certain frequencies, mainly around 200hZ. I am about to build some bass traps, however this is not a priority as any bass problems here are at the back of the room and do not affect my listening when sitting at my normal mixing position. I am currently working on a design based on these.High and Mid Frequency Absorbers
In my previous studio I mounted absorbing panels either side of the mixing area and on the ceiling above it. When I moved to my new studio the ceiling was much higher and the floor is hardwood, so I needed quite a few more panels. I now have two panels behind the monitors, one on either side, two large ones on the ceiling above the mixing position and two smaller ones on the ceiling at the back of the room. I was going to make some more, but after adding a sofa and a rug into the equation the room seemed to be about right, and once again, no complaints from mastering engineers. In the next section I’ll explain how I built the HF absorbersHome Studio Acoustics Part 2 – Making HF Absorbers
The absorbers I built are basically wooden boxes lined with Rockwool with a frame across the front over which is stretched some acoustically transparent material, in this case hessian. You need some basic tools and very basic DIY knowledge, e.g. how to use a saw and screw two pieces of wood together. Expert DIYers and carpenters can probably ignore the instructions and will probably do a much better job than I did, however I’m very happy with the results which look good and most importantly – they work very well. The sides of the boxes are timber 4″ x ½”. The back is hardboard with a couple of battens across for strength, although the backs could just be thicker wood or MDF. I chose hardboard and battens for lightness. Here I shall outline how to build a box 2’ x 4’
UK SUPPLIERS
Rockwool is better than foam as it absorbs more frequencies. You need the rigid stuff that comes in 2 inch thick slabs. Available from the insulation section of any builders merchant or large DIY store, e.g. Wickes or B & Q. You must get the compressed insulation that comes in slabs, not the soft stuff that rolls up.Materials
- Back: hardboard 2’ x 4’
- Sides: timber 12’ x 3½” x ½”
- Rockwool 2’ x 4’ x 2″
- Wood batten 1½” x ¾” x 12’
- Very small battening, approx 4’ x ¼ ” x ¼ “
- A few 1½” wood screws
- Some ½” panel pins
- Wood glue
- Hessian 4’ 6″ x 2’ 6″
- Polyester batting 4’ 6″ x 2’ 6″
- Paint (optional)
Making The Box
- Cut the sides and top of the box. Two long bits for the sides, 4’ long and two shorter bits for top and bottom (23″). (As the top and bottom fit inside the sides, which are ½” thick, the external dimension of the top will be 2’). If your timber is slightly thicker than ½” you need to make the top slightly shorter or else you will need to adjust the size of the hardboard for the back.
- Drill holes in each end of the 4’ side pieces so that you can screw into the shorter top & bottom pieces. You need to be quite accurate so the screws go into the middle of the top and bottom bits. As the screws are going into and along the grain of the top & bottom they should not need a guide hole to be drilled, but there is no harm in drilling a small guide hole if you like. A countersink can be used so the screw heads do not protrude.
- Glue and screw the sides, top and bottom. At this stage it will be quite flimsy so be careful. A professional carpenter would have used a clamps and a set square but the next stage will firm it up and ensure square corners as long as you do it before the glue sets
- Lay the hardboard back over the four screwed pieces, make sure the corners fit squarely.
- Glue the back on and pin at approx 6″ intervals
- Once the glue has set, sandpaper the box to smooth off the sawn edges.
- Paint or varnish the box to taste. (Bare wood can look good depending on the quality of your carpentry)
- Lay the rockwool inside. It’s easy to cut with a sharp knife but keep it away from bare skin as it is an irritant. (Ideally wear a mask). Cut it just slightly larger than inside of the box so it fits snugly. If the boxes are going on the ceiling it would be a good idea to glue it in with some contact adhesive.
- Covering the rockwool with batting
Lay some polyester batting over the top. This is what people make duvets out of and is much nicer stuff. I use it because its HF absorption is also very good and it will stop any stray fibres from the rockwool getting into your room. If you do this you can either tuck it in between the rockwool and box sides, or staple it to the sides. If it all fits snugly it will stay in place, although you might want to fix it in place with staples for the ceiling boxes
The Front of the Panel
You could of course leave it like it is, you now have a fully functioning HF absorbing panel, but it will look much better with a screen on the front. This is basically a frame made from wood battening with an acoustically transparent material such as hessian stretched across. The screen can other be the same size as the box and screwed onto the front (as in this illustration of the ceiling panels), or it can be made a bit smaller and set just inside, which I think can look just a tad more professional: To do this you need to make the external dimensions of the frame the same as the internal dimensions of the box, minus a little bit to allow for the thickness of the hessian. As the exact thickness of timber you used for the sides of the box may vary depending on your supplier, I won’t give the exact dimensions here, but once you have the material you can experiment to work them out. The method below is for the screens mounted inside the box.
- Cut the four pieces of battening for top, sides and bottom, glue and screw. As with the box this will be flimsy until it’s finally mounted so be careful. You can add an extra batten across the middle for strength.
- While the glue sets, sit the frame inside the box, wedged tightly with card so that it sets nice and square. Wood glue takes only about an hour to set.
- Once the frame has set, Lay the hessian out and place the frame on top
- Wrap the hessian around and staple the top two corners. You must stretch the hessian so that it doesn’t sag, but be careful not to pull to tight or it will pull the frame apart which is still quite fragile.
- Stretch again and staple the bottom two corners.
- Staple all the way along each side at intervals of 1″ to 2″, stretching gently and carefully as you go.
- Apply some wood glue along the hessian where you have stapled it and allow to dry. (Use enough to soak through the material to the wood beneath)
- Pin and glue some thin battening inside the box as supports for the frame (see illustration).
- Drill two holes in each side of the box and screw the frame in securely. If you find the hessian is too tight and is pulling the frame inwards, more screws from the sides should straighten it up.
- You can make these look a bit nicer with some plastic screw caps that fit into cross headed screws. Available from all good hardware stores.
Mounting the Panels
Mount the panels using some bent brackets
You could just screw them to the wall but it’s advisable to mount them at least 2″ from the wall as they will work much better. To do this I fixed some angle brackets onto a piece of batten along the back of the absorber. This is fixed about 6″ from the top of the panel, glued to the back and screwed into the sides. I then bent over the ends of the brackets with a pair of pliers to hook over some battening on the wall. This has a couple of bits of smaller battening glued on top as lips for the brackets to hang on. My walls were brick, but if you have a stud wall you will need to find a timber stud to screw into or use plenty of plasterboard fixings.
Spacer at bottom to hold away from wall
I then put another batten at the bottom of the panel and used a piece of 2″ wood as a spacer which does not support, it just holds the panel away from the wall. Mounting the ceiling panels was a bit tricky as you must find a joist to screw into, I wouldn’t trust a plasterboard fixing on a ceiling – if you do on your own head be it. I used a hook in each corner and some strong link chain. The panels above the mixing desk are angled slightly upwards towards the middle of the ceiling, and have some extra rockwool and batting laid on top for extra absorption.
The mobile high frequency absorber:
Coming soon part 3: Acoustic diffusers. (As soon as I've made them)
1 Replies
·
16037 views

Saxophones Selmer no longer supreme!
Okay so I was saddened when I saw this video today and a little shocked but not all that surprised.
View: https://www.youtube.com/watch?v=9PYOU5SgysM
One of my favourite players Eric Alexander has moved to a Chinese brand saxophone. Can I blame him? No as I have done the same and most of my playing buddies have cashed out of the high end French and Japanese horns. They cannot justify the investment on return and these are gigging musicians who say it just doesn't matter!
I just booked a friend and a killer alto player for a gig this past weekend. He now sells insurance, he gave up gigging a few years ago but jumped at the offer of $400.00 for an hour wedding gig. Insurance sales are not paying the bills. He has sold off all his expensive Yamahas and now has Eastern music horns.
How many young players are on Chinese or Taiwan horns these days?
The times they are a changing - sell your VI's because the up and comers won' be lusting after them. 😎
Introducing our newest BetterSax artist, Eric Alexander!
One of my favourite players Eric Alexander has moved to a Chinese brand saxophone. Can I blame him? No as I have done the same and most of my playing buddies have cashed out of the high end French and Japanese horns. They cannot justify the investment on return and these are gigging musicians who say it just doesn't matter!
I just booked a friend and a killer alto player for a gig this past weekend. He now sells insurance, he gave up gigging a few years ago but jumped at the offer of $400.00 for an hour wedding gig. Insurance sales are not paying the bills. He has sold off all his expensive Yamahas and now has Eastern music horns.
How many young players are on Chinese or Taiwan horns these days?
The times they are a changing - sell your VI's because the up and comers won' be lusting after them. 😎
34 Replies
·
713 views


Mouthpiece/Lig FS Mouthpieces for sale
Hello, I have two excellent mouthpieces for sale in perfect condition.
Tenor PPT - 8* - £150
Soprano Pillinger - PJ 7 (LAR) - £125
Happy to take questions
Pictures below
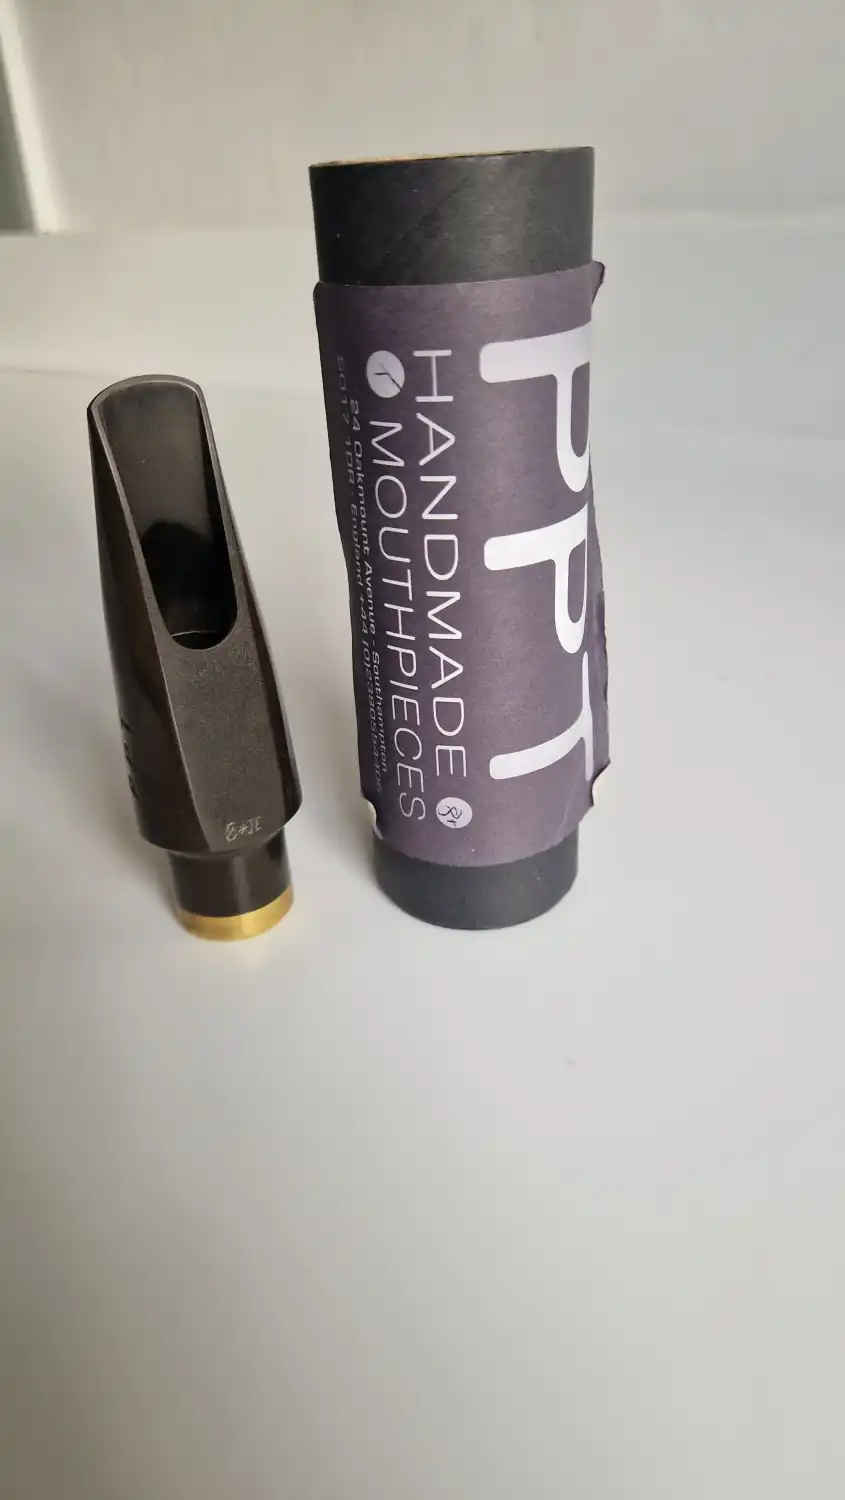
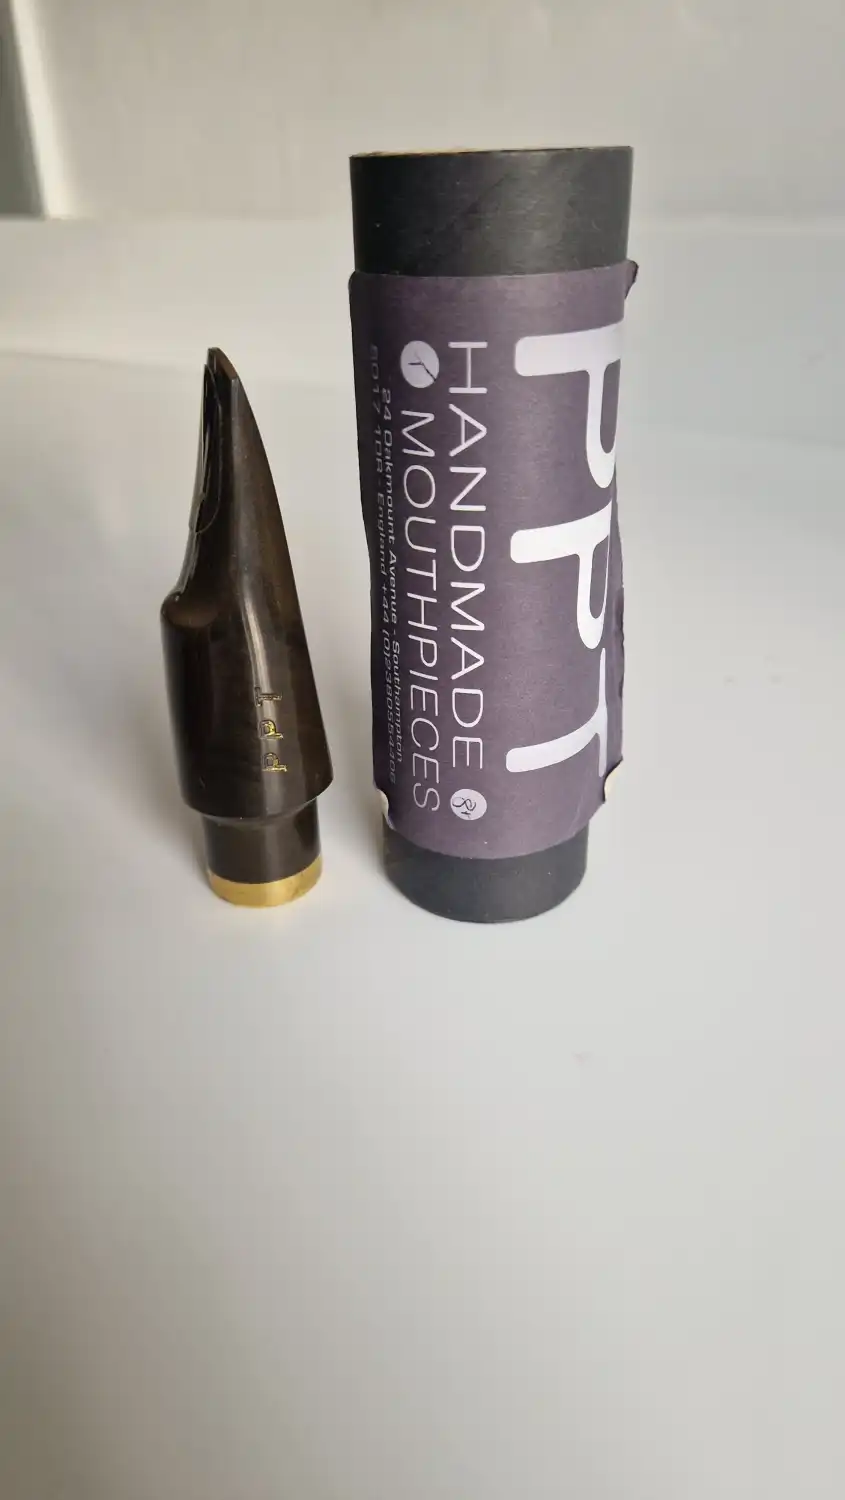

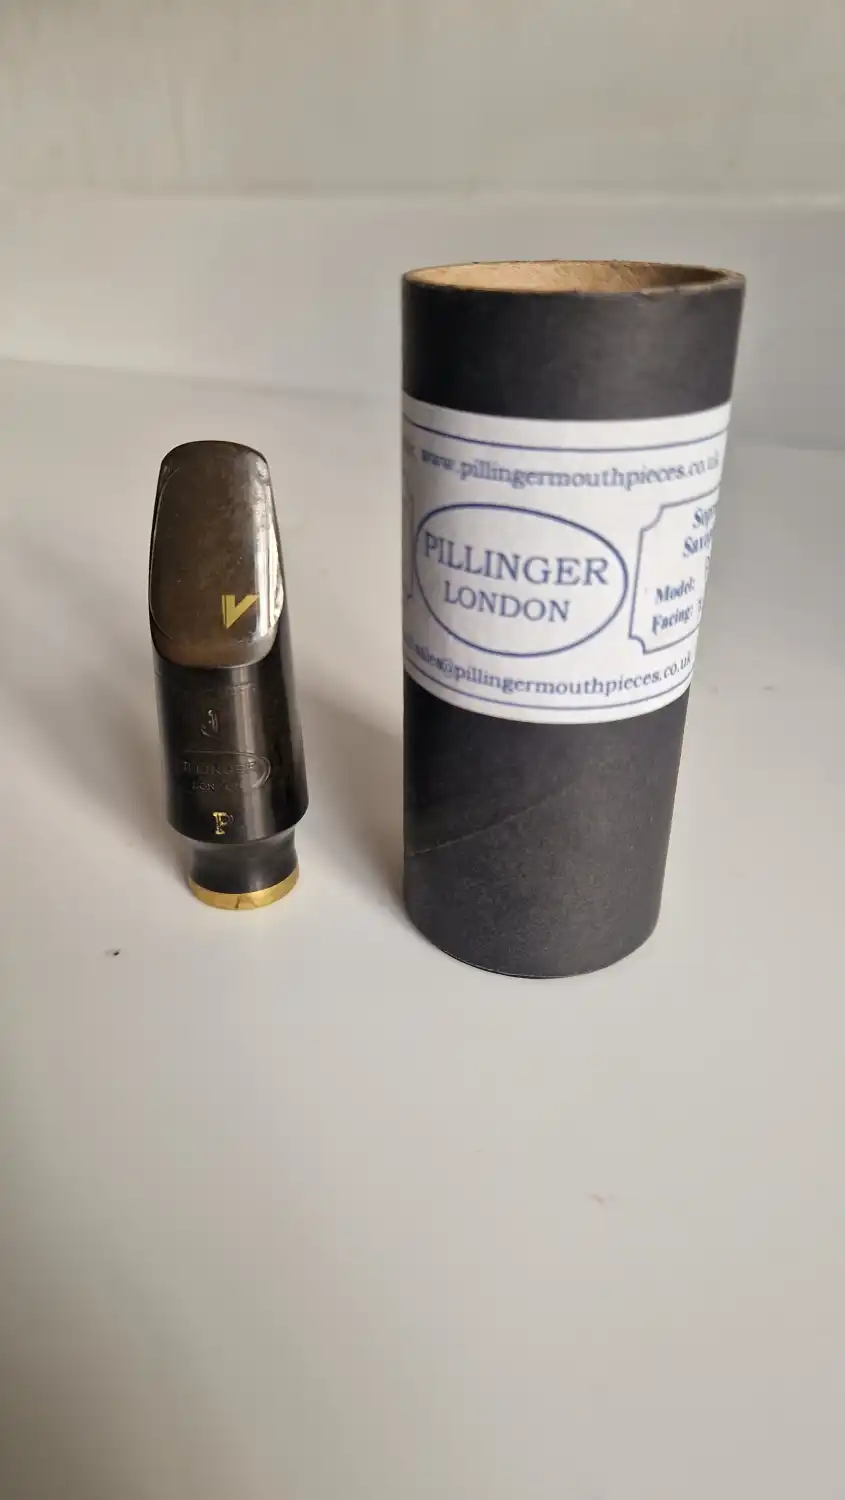
Tenor PPT - 8* - £150
Soprano Pillinger - PJ 7 (LAR) - £125
Happy to take questions
Pictures below
1 Replies
·
72 views

R & B, Blues, Soul Recommended Blues Listening
My teacher has suggested trying to improvise over a blues progression.
For various reasons I've barely touched my saxes since, I'm after some listening recommendations to give me a little bit of inspiration.
So what should I be listening to?
For various reasons I've barely touched my saxes since, I'm after some listening recommendations to give me a little bit of inspiration.
So what should I be listening to?
28 Replies
·
423 views
Saxophones Another Beaugnier
Apologies for a lengthy absence from the Cafe, new home (with neighbours) and other commitments has restricted my playing/practising/generally making a noise somewhat.
I have been happily playing on my Martin, again many thanks to @griff136 and my local tech.
I have expressed my admiration of the Beaugnier marque on several occasions and when a Noblet came up on Ebay I couldn't resist it but several characteristics are different to research I have done into the Beaugnier models, no bent nail bell brace, angled left hand pinky keys, right hand bell keys, different C/Eb key design and different keyguards. I found the same tenor model sold by Stohrer Music some time ago identified as a Beaugnier and a similar alto tested by jazzmanted on Youtube.
It's in superb condition, plays nicely and came with a 1950's Vandoren Perfecta which works really well with the horn. Anyone else come across these.
I have been happily playing on my Martin, again many thanks to @griff136 and my local tech.
I have expressed my admiration of the Beaugnier marque on several occasions and when a Noblet came up on Ebay I couldn't resist it but several characteristics are different to research I have done into the Beaugnier models, no bent nail bell brace, angled left hand pinky keys, right hand bell keys, different C/Eb key design and different keyguards. I found the same tenor model sold by Stohrer Music some time ago identified as a Beaugnier and a similar alto tested by jazzmanted on Youtube.
It's in superb condition, plays nicely and came with a 1950's Vandoren Perfecta which works really well with the horn. Anyone else come across these.
109 Replies
·
9778 views

Clarinet Stupid question about clarinets
Having recently fallen in love with the bass clarinet but being very naive about all things clarinet related can I ask a question to any clarineteers out there. How do I tell if a Clarinet is a German system model? I’m trying to get a case for my 1960s Kolhert and the question- is it German system or not- keeps on coming up. Any assistance on this one?
10 Replies
·
1959 views
Cafe Moderator
Commercial
Playing the saxophone What are the most common problems. Either for yourself or students if you teach?
I know what mine are (or were) what about yours?
Originally I think it was tuning but I probably wasn’t aware - which is another problem in itself.
Another one was finding my playing was inconsistent so it was difficult sometimes to pin down issues.
Originally I think it was tuning but I probably wasn’t aware - which is another problem in itself.
Another one was finding my playing was inconsistent so it was difficult sometimes to pin down issues.
choose up to 4 common problems you have experienced, either you or your students?
17 votes total
29 Replies
·
540 views

I can't even suss out what the benefit might be.
It's outside the box - will give them that. 😀
Not a P. Mauriat hater - one of my backup altos is their Black Pearl and it's a really great looking horn but not really sure what they are going for here.
R&C beats them for efficiency. They are claiming Two Voices from only one bell lol...

It's outside the box - will give them that. 😀
Not a P. Mauriat hater - one of my backup altos is their Black Pearl and it's a really great looking horn but not really sure what they are going for here.
R&C beats them for efficiency. They are claiming Two Voices from only one bell lol...
9 Replies
·
155 views

Cafe Moderator
Commercial
Animals Show us your pets.
I apologise in advance but rest assured the Café is not going to turn into Facebook.
As a competition maybe the photo with the most likes or funnies gets a prize. I can offer a Cebulla or B.Air neck strap, as a prize. Might think of a few more. Or else a book or DVD. Or something else.
As a competition maybe the photo with the most likes or funnies gets a prize. I can offer a Cebulla or B.Air neck strap, as a prize. Might think of a few more. Or else a book or DVD. Or something else.
343 Replies
·
23137 views

Miscellaneous Is AI taking over!
I just made this with AI today (inspired by my daughters recent wedding) and was totally mind blown... The song itself, band, singer and sax solos were just too good... There's no future for humans in music if this is just the early stages!
Walk her to forever
Walk her to forever
650 Replies
·
28097 views

Saxophones Pork Tales: Saxophone Repair DIY Adventures.
Tales from a pig that likes to stick his nose into everything.
Paint that S. How difficult could it be ?

1) Search the net.
2) Find the color.
3) Order color.
4) Study task on University of YouTube, aka; For destruction by DYI presented by pro tech.


Do the cleaning & prep.

Paint and cleanup / detail the edges with hard cotton swabs. Sounds easy……

Yeah tha guy Matt makes it look easy.
Anyone remember your first experience cooking bacon crispy while still in the frying pan !
Paint that S. How difficult could it be ?
1) Search the net.
2) Find the color.
3) Order color.
4) Study task on University of YouTube, aka; For destruction by DYI presented by pro tech.
Do the cleaning & prep.
Paint and cleanup / detail the edges with hard cotton swabs. Sounds easy……
Yeah tha guy Matt makes it look easy.
Anyone remember your first experience cooking bacon crispy while still in the frying pan !
1120 Replies
·
63779 views

Beginner Saxes Arbiter pro sound... Taiwan.
just got myself a Arbiter pro sound sax, it stamped Taiwan and s/n 481296, someone said it was from about 1988 as it not stamped London... plays really well and I really like it a lot just wanting to know more about it as information seems very scarce...
41 Replies
·
5341 views

Miscellaneous Foroverse - what's all that about?
As an amateur standup comic would ask.
Just a forum feed consolidation place?
Like a better RSS reader?
Or
Some kinda VerticalScope Inc without the rapacious capitalism?
A new land-grab that'll turn the screws later?
A community led collective utopia?
Or
A multiverse for fora where threads can be confused and make sense at the same time?
Just a forum feed consolidation place?
Like a better RSS reader?
Or
Some kinda VerticalScope Inc without the rapacious capitalism?
A new land-grab that'll turn the screws later?
A community led collective utopia?
Or
A multiverse for fora where threads can be confused and make sense at the same time?
20 Replies
·
257 views
Dear Forum Members,
I’m very glad to host my first SOTM here in the café. I choose „The Chicken“ from Pee Wee Ellis. I’m shure, most of you know the song from Jaco Pastorius, but there are several other recordings out there.
View: https://www.youtube.com/watch?v=TgntkGc5iBo&list=RDTgntkGc5iBo&start_radio=1
Here are lead sheets in C, Bb and Eb (one document) and some backing tracks (many more on youtube).
Dropbox
For soloing and scale decisions, I found this guitar video helpful, but I personaly think blues most of the time and try to play groovy and in time instead of overthinking the notes too much.
Hoping for many funky contributions!
All the best
Dirk
View: https://www.youtube.com/watch?v=wQZbsadHm2A&t=17s
I’m very glad to host my first SOTM here in the café. I choose „The Chicken“ from Pee Wee Ellis. I’m shure, most of you know the song from Jaco Pastorius, but there are several other recordings out there.
Here are lead sheets in C, Bb and Eb (one document) and some backing tracks (many more on youtube).
Dropbox
For soloing and scale decisions, I found this guitar video helpful, but I personaly think blues most of the time and try to play groovy and in time instead of overthinking the notes too much.
Hoping for many funky contributions!
All the best
Dirk
10 Replies
·
629 views

This is the only mouthpiece currently in production that can hold its own against my Otto Link Slant. I’ve been playing this Morgan Classical for a while now, and to me it's just wonderful. Finally, someone made a "no-baffle" baritone mouthpiece with a one-inch neck extension—essential for those who play a Conn.
I want to make clear that I have no sponsorship or any endorsement deal; I bought the mouthpiece just like anyone else. What do you think?
P.S. Turn on English subtitles in the youtube menu.
P.P.S I have played the Morgan Florida, which I returned for the classical. so you can compare both.
View: https://www.youtube.com/watch?v=TZFd2_aftKM
I want to make clear that I have no sponsorship or any endorsement deal; I bought the mouthpiece just like anyone else. What do you think?
P.S. Turn on English subtitles in the youtube menu.
P.P.S I have played the Morgan Florida, which I returned for the classical. so you can compare both.
10 Replies
·
245 views
Tech/maintenance Abalone key pearls
Needed to order from Amazon so I added a set of these to see what they're like: Bnineteenteam Key Buttons for Alto Sax, 9pcs Sax Abalone Shell Key Buttons Saxophone Key Button for soprano, alto and tenor saxophones : Amazon.co.uk: Books
Not expecting much. Most of the "real shell" pearls I've looked at seem to be covered in acrylic which means they're no different than a plastic key surely?
Anyway... for a fiver it's worth a go. Let you know what they're like once they arrive.
Not expecting much. Most of the "real shell" pearls I've looked at seem to be covered in acrylic which means they're no different than a plastic key surely?
Anyway... for a fiver it's worth a go. Let you know what they're like once they arrive.
141 Replies
·
8581 views


Member Blogs (currently active)
-
 Saxophones Pork Tales: Saxophone Repair DIY Adventures.
- Started by PigSquealer
- Replies: 1K
-

-

Trending


Popular Discussions on the Café
-
 Saxophones C Melody Saxophones
- Started by Andy Hornblower
- Replies: 689
-
 Saxophones Carrying a tenor on a (motor)bike?
- Started by Jay
- Replies: 779
-
 Saxophones How will Tariffs affect Sax Prices?
- Started by Ivan
- Replies: 465
-

-
 Playing the saxophone The Cafe Trio grown to Octet down to Sextet
- Started by trimmy
- Replies: 844
-
 Great Players Who sparked your love of Sax music
- Started by jools
- Replies: 619
-
 Playing the saxophone Learn to play by ear or by reading music
- Started by Taz
- Replies: 1K
-
 Tech/maintenance My new "DIY" pads...
- Started by DavidUK
- Replies: 393
-
 Theory & Impro Do we really need theory?
- Started by jbtsax
- Replies: 497
-
Misc Reviews Yamaha YDS-150 Wind Synth
- Started by Acc6441
- Replies: 301
-
 Playing the saxophone Learning to Read v Playing by ear
- Started by BigMartin
- Replies: 505
Featured Classifieds
Latest Song of the Month
-
-
 SOTM SotM September 2026 - Autumn Leaves
- Started by mrblackbat
- Replies: 27
-

-

-
 SOTM SOTM June 2026 "And You Just Smile" (from ear to ear- training)
- Started by LostCircuits
- Replies: 11
-
SOTM SOTM May 2026 - Always Remember Us This Way
- Started by MikeMorrell
- Replies: 39
-
 SOTM SOTM April 2026 - Freedom Jazz Dance
- Started by rhysonsax
- Replies: 14
-
SOTM SOTM and PETE (Play by Ear Training Exercise)
- Started by Wade Cornell
- Replies: 16
-
SOTM SOTM Feb 2026 - On Green Dolphin Street
- Started by mrblackbat
- Replies: 44
-
 SOTM SOTM January 2026: Our Love Is Here to Stay
- Started by GCinCT
- Replies: 46
-
SOTM SOTM December 2025: Wexford Carol
- Started by MikeMorrell
- Replies: 37
-
 SOTM SOTM November 2025 - Red Baron
- Started by sax panther
- Replies: 36