• New!

    Try our new Social Feeds, look out for the navigation icon: . You can now set default social feed view in your account preferences.

Tech/maintenance A general thread on DIY repair

Just curious, why would that be a problem? And, what HGM would be the best for sax pads?
Some HMG (hobby craft grades) goes into a plastic state around 120°F /49°C. Just imagine a kid on a marching field during summer heat, or think of that black case oven.

Look to 3M for a heavy body, high temperature rating (140°-170°F). 30 to 45 seconds working time. Doesn’t string or expand / contract with thermal change. There are people in the band instrument repair trade that use HMG on sax pad work. I don’t do production rental work with spongy pads.

The Music Medic synthetic clear shellac is a formulated HMG.
This stick was in my supply cabinet inside my garage. It bent from the rubber bands holding the bundle of 4 together.
1765257400937.webp


I discontinued using the MM six years ago. Still it’s a quality usable product with some advantages.
I currently make my own sticks from 100% natural dewaxed flakes. I buy about five pounds a year. Each pound makes 16-1oz sticks. One sick will complete a tenor.
1765257896896.webp
 
While I am (still) waiting for the shellac I ordered to turn up - pads are here - I had a little go at the lip of the bell on my baritone. The bottom of the bell lip has had a big clout some time in the last 107 years and it has flattened the radius on the last part of the bell flare a little, as it bent the bottom of the lip down and put a slight crease into it. So I tried leaning quite hard on the bottom of the lip on the edge of a stout bench (pushing the lip 'up'), while using a 1" (or thereabouts) wooden roller to work along the crease and see if I could persuade it to move. Nope - it is springy, which might be work-hardened by the accident, and maybe even a little by my attempted manipulation. I thought I might try heating it up (gas torch ?, elec heat gun - surely not enough heat?) to try to anneal it, and then try my approach again. Silver plate is already lost from this area, which is something less to worry about. Well, any thoughts are welcome, thanks.
 
The bell lip edge most likely has a steel ring inside. Can’t offer much advice without seeing pictures.

The technique I use. Cover bench top with leather. Bell face down on the leather. Area in need hanging off edge of bench. Select an appropriate rawhide mallet. With glancing strikes to rim work to level close/ relieving stress. Work the dent(s) and rim jointly to finish.

Matt has a video somewhere on this.

More to study from.
 
Thanks for viewing suggestions - I'll make some time to have a watch.
I spend no less than three hours a week studying repair craftsmanship. Anything from watch restoration to machine shop skills. Today I studied hand sewing and different stitches. Skills for repairing leather on cases or the fabric inside.

Wes has some excellent dent repair videos too.
 
Well, the alto is all back together and it almost works 🙂. A process of elimination suggests very small leaks on D# and C - you can see from the pics what I am trying to do about that. My girl is home from university, so for once there are pics - this sax had 25 years of tarnish all over it, and I am pleased with how it has shone up. Two new pads (F and D#) shellac-ed in - thanks for all your advice. Reassembly went slowly but surely, with a slight panic that middle C# was very flat - I managed to spring the pad above B shut, rather than open, and this did my head in for a bit. Just before I started really messing with bits of cork then penny dropped - if I had a working memory, I'd remember next time.

IMG_2237.webp
IMG_2239.webp
 
(You might just be able to see that the pearl button on F has really had it. All the others are OK. If my Mum were still with us, I bet she'd have something in her button box 🙂 ).
 
Just before I started really messing with bits of cork then penny dropped - if I had a working memory, I'd remember next time.
Looks really nice. You have achieved your goal in a very short time. It’s not uncommon for 1st time DIYers to take six months or more. Very easy to forget the multitude of small details.
To this day I take a series of pre disassembled pictures. During tear down pictures of part orientation can be helpful later.
Projects can be delayed or interrupted often around here. Nothing wrong with handwritten notes.
lol, I forgot to note what each column is.
1767729647612.webp
 
Looks really nice. You have achieved your goal in a very short time. It’s not uncommon for 1st time DIYers to take six months or more. Very easy to forget the multitude of small details.
To this day I take a series of pre disassembled pictures. During tear down pictures of part orientation can be helpful later.
Projects can be delayed or interrupted often around here. Nothing wrong with handwritten notes.
lol, I forgot to note what each column is.
View attachment 32302
A bound lab book - essential equipment for the serious laboratory investigator (a previous life for me, though I probably flatter myself). You might have noticed an unbound piece of A4 on my table with lumps torn out of it - I am clearly not a serious laboratory investigator any more 🙂 I'd do well to go back to that approach, my memory really is terrible.

(You might remember that one or two of the pins on which the rollers sit are stripped; one of the long rods is, likewise. I might do something about this one day, but I don't think I am up to drilling out a pillar (is that the term?) and re-bushing it, though I suppose I could make larger pins for the rollers and cut oversize threads in those keys. A shameful admission, but I suspect that will happen only if one of those stripped pins drops out and is lost. I could always wrap a sliver of PTFE tape around the threads or use a blob of Stag!)
 
You might remember that one or two of the pins on which the rollers sit are stripped; one of the long rods is, likewise.
Just flash the inside of the hole with solder.
You might have noticed an unbound piece of A4 on my table with lumps torn out of it
I didn’t notice the footnotes until you mentioned it. Starting out keeping everything sorted can be difficult for some.
A alternative. Take a picture R, L, F & B. Print the photos on copy machine @ low quality in black. Glue the prints on a cardboard form old corrugated box. Stick rods into cardboard where they came from. Note info / pad required on picture.

Wall art is also handy. Just search for one you can relate to.
1767739116391.webp
 
Just flash the inside of the hole with solder.
That has crossed my mind as a possibility, but your mentioning it here helped to confirm it as a quick easy solution to stripped threads. Do you use lead/tin or silver solder? Do you run a drill bit and tap through it afterwards to clean it up?
 
That has crossed my mind as a possibility, but your mentioning it here helped to confirm it as a quick easy solution to stripped threads. Do you use lead/tin or silver solder? Do you run a drill bit and tap through it afterwards to clean it up?
This was first suggested to me by Gordon Parker (RIP) aka GordonNZ on the other place. The suggestion was made based on an overview of conditions. That being NOTHING else needed. Only that enough bite was needed to secure a rod in place.
Flashing (aka tinning) is a thin layer. This done with a low temperature (280°-320°)soft solder. I don’t run across the need often, but when I do. I use a 60/40 solid core soft solder and acid paste flux. Just make sure the area is properly prepared. Like shielding/ masking the exterior area with anti-flux or liquid white-out. Especially on silver plating.
Clean post surgery with baking soda & water mixture to neutralize area acid. Then gently run the rod in to self tap the threads. Assemble as normal being attentive not to over tighten the rod.
 
Rather than mess up @PigSquealer 's blog thread, I thought I might post an appeal here to ask him what kind of tenon-expander he uses?

I just bought another alto, for stupid reasons. 1) it was very cheap, and 2) it is more-or-less the same instrument which my Dad had at home, which I began on nearly 50 years ago, and which I stupidly hassled him to PX for what turned out to be a rather poor Chinese tenor about 5 or 6 years later.

It's a 'Lewin' branded Martin Handcraft stencil, as ours was all that time ago. It lacks the 'name that will WIN you fame' stamp ours had, but it has the same dark, worn lacquer (ours looked like this is the late 70s!). I am not sure if ours had a front F or not. Most importantly, the smell which greeted me when I opened the case took me right back. I would really have been disappointed had it not smelt like this - it is such a memory! I think our case had a Bill Lewington sticker in it - it would have been a big deal for Dad to get hold of it in the 60s.

I couldn't get much noise out of it when I picked it up, but here it is with immediate triage - three bits of insulating tape, a strip of paper envelope around the neck cork and an elastic band replacing the uppermost spring on the top stack which is missing and which holds C# open. And it works, after a fashion, right down to Bb - I am having fun with it. The elastic band is anchored on the B-C side trill key at one end, which gives it a second starring role besides its regular cameo appearance in 'Footprints' 🙂

And the tenon? Well, the neck is a lovely fit, but the factory-provided brass 'bung' (again, I think a little different in pattern from our old one) was loose. I expanded it over the end of a motorbike gearbox shaft (started as a good fit...uh oh) with some thin shim wrapped around it (arrghh, too much!) and ended up mega tight. So I took it down again with a linisher. I am glad this thing is mine and not someone else's. Expanders on the web also seem like slow tapers on bits of steel with knurled bits to hold - I could make one of these quite easily (small lathe) but it seems to me that it will only expand the far end of the thing you push it up, whereas something more complex and expanding might be required to expand a broader 'patch' - like the things sold for making car exhaust pipe, sadly too big for this job. I'll probably not need to do this again, but it would be nice to know.
 
Here's a pic. (My girl is finishing university about now, and I was down there this week picking up half her stuff so there is less to fit in when my wife and I attend (fingers crossed) graduation. As we were walking, a street near the colleges was littered with fizzy wine / champagne corks...it is that time of year. I now have enough to repair 50 saxophones).

I know if this was 'Martin' branded it would be a Handcraft Mk3 from the late 20s. I assume they carried on with older horns as stencils, so this could be a bit later? I doubt serial numbers are likely to be helpful; this is 182057.

S7000132.webp
 
Rat🙂

And the tenon? Well, the neck is a lovely fit, but the factory-provided brass 'bung' (again, I think a little different in pattern from our old one) was loose. I expanded it over the end of a motorbike gearbox shaft (started as a good fit...uh oh) with some thin shim wrapped around it (arrghh, too much!) and ended up mega tight. So I took it down again with a linisher. I am glad this thing is mine and not someone else's. Expanders on the web also seem like slow tapers on bits of steel with knurled bits to hold - I could make one of these quite easily (small lathe) but it seems to me that it will only expand the far end of the thing you push it up, whereas something more complex and expanding might be required to expand a broader 'patch' - like the things sold for making car exhaust pipe, sadly too big for this job. I'll probably not need to do this again, but it would be nice to know.

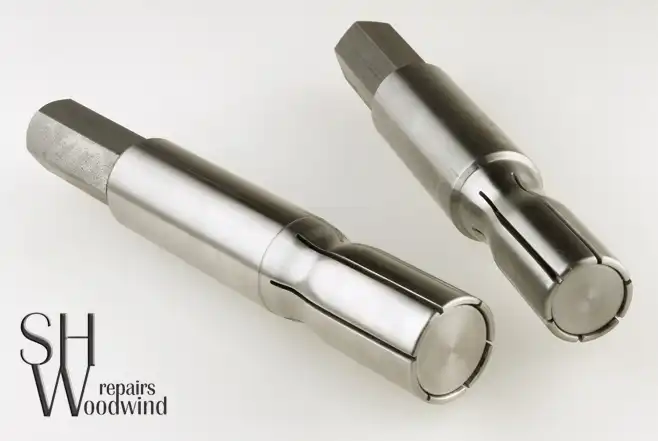
Leaf or tongue expanders are easy enough to make if you have a lathe.
The issue of the tools only contacting the tube at the tip of the tool can be alleviated by putting a half degree taper on the leaf section, plus you'll need to round the tips of the leaves off somewhat.
Forget about a knurled knob - you'll need something with a lot more oomph.

I've made about a dozen of these things down the years, including a few made in bronze. These are quick to make and serve as 'sacrificial' expanders that can be quickly re-machined to fit specific jobs.

Here are my manufacturing notes:

303 or 304 stainless steel.
Crook tenon expanders - put 1/2 degree external taper towards the tip on leaves.
5 degree internal taper
10mm through hole
120mm long
Bolt - M10 x 150 stainless. Use these to make the expansion pin. Turn the head of the bolt down, silver solder or braze a lump of ss (turn a pin and socket joint for extra strength) onto the bolt then turn it to size and taper.

Cutting the slots can be tricky - I make three cuts (so six leaves) and unless you have a slitting saw attachment for your lathe you'll have to do it with a hacksaw. It's not a critical feature, so if you go offline a little way it's no big deal. But...every single part of the tool head must be perfectly smoothed off and highly polished.
When using the tool I lubricate the head with a smear of beeswax into which I've melted a spoonful of gear oil.


steel tenor explander smaller.webp


And once you have a tenon sleeve expander you'll need a compressor sooner or later!

That weird-looking expander? It's for those jobs where there's wear right at the point where the tenon sleeve is soldered to the crook. A sort of pin-point expander, if you like.
Also comes in handy for dealing with tenon sleeves that have an internal taper.


C mel crook tenon job smaller.webp
 
Hey, thanks @Stephen Howard - that's really helpful, thanks for the effort with all the pictures. I made something like that (the one with the 'lump' on the end) for getting bearings out of a blind hole in a bike gearbox, but with fewer 'leaves'. I do have something I can set up with a slitting saw on it, so that bit is OK. I think I have some MT2 reamers somewhere - perhaps that might make the taper a little more predictable / likely to match, than me trying to bore it with a small bendy boring bar. Somewhere I even have a long length of 1" stainless bar - outside, I think, as I decided it was not going to go rusty 🙂

The compressor - I guess you make split bushes shown with ID to suit job and OD to suit your closing jig (with hinge etc)? Is hinge better than doing the thing up in a vice?
 
Hey, thanks @Stephen Howard - that's really helpful, thanks for the effort with all the pictures. I made something like that (the one with the 'lump' on the end) for getting bearings out of a blind hole in a bike gearbox, but with fewer 'leaves'. I do have something I can set up with a slitting saw on it, so that bit is OK. I think I have some MT2 reamers somewhere - perhaps that might make the taper a little more predictable / likely to match, than me trying to bore it with a small bendy boring bar. Somewhere I even have a long length of 1" stainless bar - outside, I think, as I decided it was not going to go rusty 🙂

The compressor - I guess you make split bushes shown with ID to suit job and OD to suit your closing jig (with hinge etc)? Is hinge better than doing the thing up in a vice?

The internal taper isn't that critical - the actual working length is less than a centimetre, so get that bit nice and smooth and you'll be fine. The rest is really to take some of the mass out of the leaves to allow them to flex a little easier.
I daresay the design could be improved upon - but once I got to the point where they worked, I decided not to bother going any deeper.

As for the compressor, yeah, it needs to be hinged. You need some way of keeping the jaws aligned otherwise every time you remove the crook to test the fit, you'll have to set the tool up again. I was going to make up a dedicated clamp for the system (a modified bench vice would do) but again, this worked and I left it at that.
You'll definitely need to be able to lock the collect in place to stop it revolving. I just used a dimple in the collet that matches up with a corresponding hex bolt in one of the jaws.
There is a 'trick' when it comes to sizing the collets...but I didn't write it down! I seem to remember it had something to do with the internal diameter of the collets in relation to the tenon sleeve. Something tells me I bored them ever so slightly undersized because when you slit the collets they open out slightly. The OD is set to match the bore of the holder which is 32mm...and the collets are 25mm long.
The collets are stainless steel. I tried a number of steels, including EN8 - which can be hardened - but found that 304 ss gave the best surface finish on the collets and was the least inclined to gall.

As per the expander, everything has to be squeaky clean and smooth - and I use the beeswax grease to lubricate the job.
 

Similar threads... or are they? Maybe not but they could be worth reading anyway 😀

Trending

Forum statistics

Topics
32,297
Messages
577,144
Members
8,094
Latest member
RocknJ
Back
Top Bottom